

How To Create A Digital Signature In Microsoft Outlook 2010

In this article, I'm going to review Creating Self-Signed certs using the latest version of Microsoft Office 2016
One of the most compelling parts of the Microsoft Office productivity suite for power users is automating functionality using Visual Basic for Application code. Applications such as Word, Excel, and Outlook can be used to create Macros. Macros are small bits of programming code used for performing repetitive tasks. In versions of Office before 2007, VBA support was notorious for being exploited. Since then, Microsoft has enhanced the security within the suite, limiting the impact of rogue code causing potential damage.
Previously, we showed you how to set up and configure a Self-Signed Digital Certificate in Office 2010. Since then, some things have changed in the Office 2016 release. In this article, I'm going to review Creating Self-Signed certs using the latest version of Office.
Setup Self-Signed Digital Certificate in Office 2016 Applications
The Digital Certificate for VBA Projects can now be found within Program Files > Microsoft Office > root > Office16.

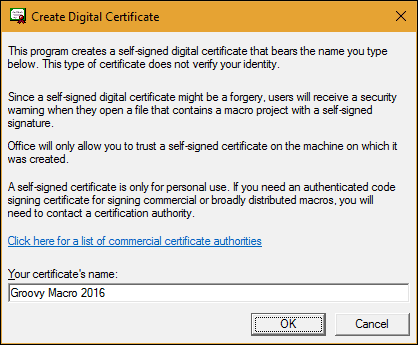
Double click the SELFCERT file, enter a name for your Digital Certificate, then click OK.
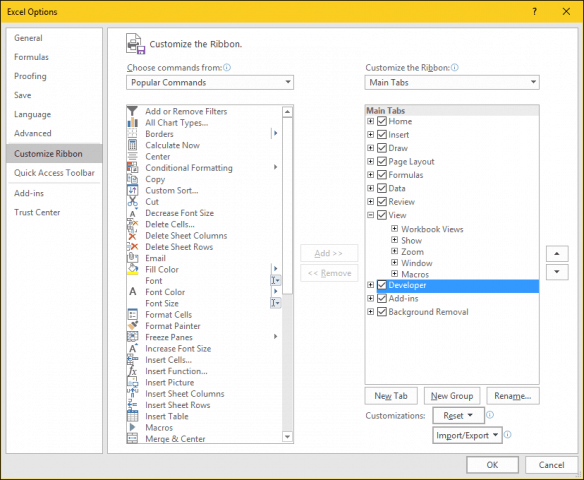
Launch any of the Office applications you would like to use the digital certificate in. For this article, I am going to use Excel. The first thing you will need to do is enable the Developer tab. Click File > Options > Customize Ribbon > check the box Developer then click OK.
Select the Developer tab, then click the Macro Security button within the Code group, select the Enable all Macros radio box, then click OK.

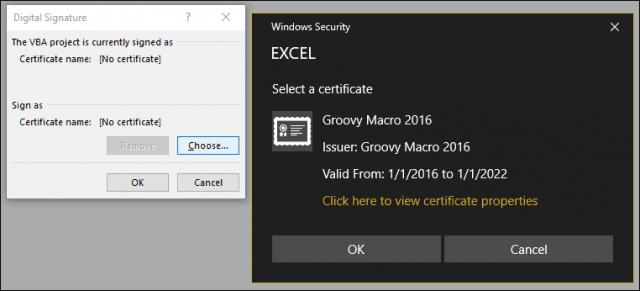
Within the Code group, click Visual Basic. The Visual Basic for Applications component will be launched. Next, click Tools, then click Digital Signature.

Click Choose, the recently created digital certificate will be presented. Click OK, then proceed to save your project.
Ensuring your Macros Work
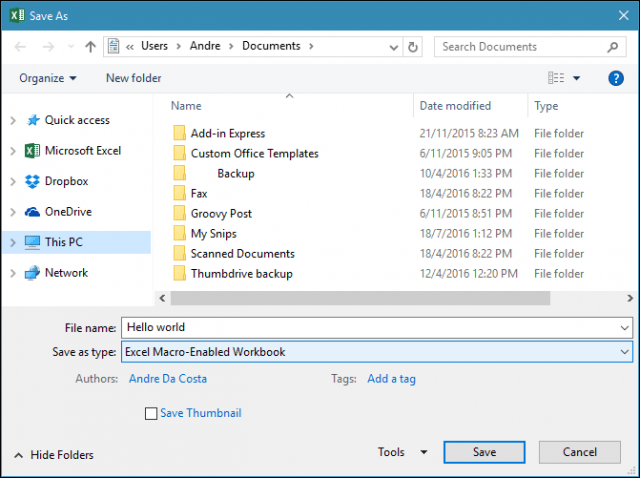
I noted earlier; Microsoft has made security changes to how Macros work in Office applications over the years. Saving your Macro's is not allowed in a standard workbook or document.
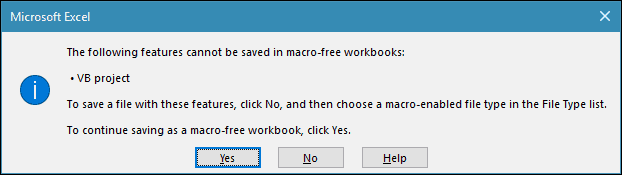
Instead, users must correctly choose Macro-Enabled as the file type when saving.
Users can manage their signed certificate by using launching Internet Options. First, click Start, then type: internet options, hit Enter on your keyboard, select the Content tab, then click Manage Certificates. Here you have the choice of deleting or exporting your certificate for use on another computer.

Check out our previous example of how to set up a handy Macro in Microsoft Outlook for enabling Blind Carbon Copy.
![]()
How To Create A Digital Signature In Microsoft Outlook 2010
Source: https://www.groovypost.com/howto/create-self-signed-digital-certificate-microsoft-office-2016/
Posted by: ashtwild1966.blogspot.com
0 Response to "How To Create A Digital Signature In Microsoft Outlook 2010"
Post a Comment